Wednesday, May 28, 2014
Tuesday, March 25, 2014
Penelope Shawl pattern


I put this up as a free pattern on Ravelry a while back, but wanted to add it here to make sure you knew about it. Penelope is a great first shawl pattern as it is easily memorized so there's no need to keep looking at the pattern as you make the body of the shawl. It's a joy to make. It's shown here in Red Heart Boutique Unforgettable, but any yarn and hook size will work.
Friday, March 21, 2014
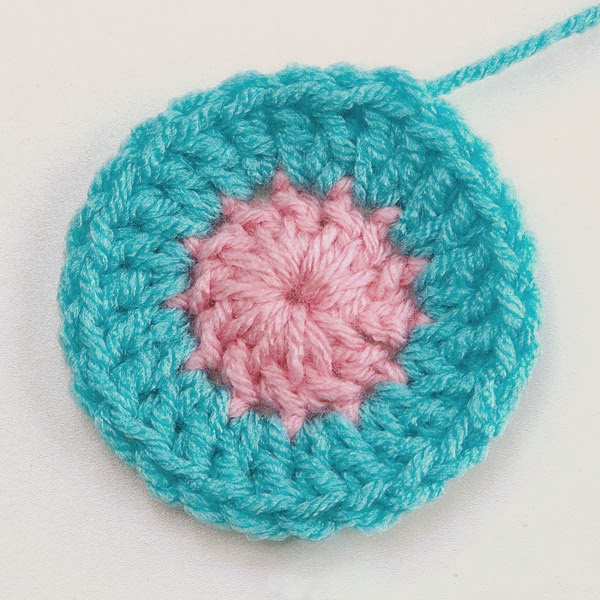
Border Rounds and Finished Circle Dance Afghan

For the border rounds, I simply worked two rounds of dc in each st with (2 dc, ch 2, 2 dc) in each corner.
Then we gave it a nice steaming laid out on the bed, and the finished result is ready to go to its new home at my daughter's house.
Sunday, February 2, 2014
Sewing Blocks Together
Now we’re about ready to sew some of the blocks together. On
this design, not all the stitches along the outer rounds are not going to add
up exactly, so we’ll have to get a little creative when sewing them together. I
sewed my blocks together by whipstitching through both loops, but if you
prefer, you can go through the back loop only.
Stitch markers or safety pins
are almost a must when sewing this afghan’s mishmash of blocks together,
because you can use them to mark block beginnings and endings.
Because these blocks are 2”, 4”, 6”, 8”, 10” and 12”,
everything is in 2” intervals as you sew them together. So if a block is offset
to its neighbor, it will be by 2”, 4”, and so on.
Say you need to sew the seam indicated in the photo below.
The 4” block lines up with the top of the 6” block, so you’ll measure the 6”
block and place a marker at 4”. Then line the 4” block up between the top of
the 6” block and the marker, and whipstitch together, working in any extra
stitches if one side has more stitches than the other. It works best if you
fudge in the extra stitches in the middle of sewing blocks together, not at the
corners.


All of this probably sounds more complicated than it really
is. I’ve outlined exactly what to do to make the joinings as precise as
possible, but all this really means is fudge a little to make each one fit, and
sew them together. You might want to sew sections of squares together, then sew
the sections together into larger sections. For the very best results, you can steam
block your squares beforehand and block and steam as you sew, steaming little
sections of squares sewn together as you get them done. This is not absolutely
necessary, but it’s what I did with mine so they would look extra nice in the
photos.
Thursday, January 23, 2014
Circle Dance 2" and 6" Squares Added

How are you coming along on the Circle Dance Afghan? I'm enjoying seeing the photos on Ravelry and Facebook. If this is the first you've read about this fun Crochet Along project, go HERE to read all about it and see the posts from the last couple of weeks for all the details.
Some people are having a bit of trouble getting the correct size blocks. Tamara over on www.mooglyblog.com wrote a great article on this subject, and rather than repeat her words, I'll send you over there to get the scoop. Here's the article:
http://www.mooglyblog.com/make-work-getting-afghan-squares-size-need/
Basically, you can add a round of sc, hdc or dc to the block as needed, with (2 sts, ch 2, 2 sts) in corners to get the correct size.
I've posted the 2" and 6" blocks on this post so now all the patterns are posted.
http://carolynchristmasdesigns.blogspot.com/2014/01/circle-dance-4-and-10-square-patterns.html
I've saved these two for last because the math on these is a little different from all the others. The others all start with 14 dc and increase in multiples of 14. The 2" circle starts with 12 dc, and the 6" circle starts with 16 dc. The reason for this is that, for the 2" circle, 14 does not divide evenly by 4 to make a square, so I used 12. For the 6" circle, I needed the last round to be divisible by 4, and 14 x 3 is not divisible by 4 so I used 16. Handy the way it all works out, isn't it?
I hope you're getting along nicely with your afghan blocks. My project is going well and I can hardly resist starting another one! Next week I'll post about sewing the blocks together.
Sunday, January 19, 2014
Putting All Circle Dance Patterns in One Post
Sorry to keep moving things around. I've had a request to put all the square patterns into one blog post, which I thought was a fine idea, so I've placed all the patterns so far into this post:
http://carolynchristmasdesigns.blogspot.com/2014/01/circle-dance-4-and-10-square-patterns.html
When I add the 2" and 6" patterns, I'll add them to this same post.
http://carolynchristmasdesigns.blogspot.com/2014/01/circle-dance-4-and-10-square-patterns.html
When I add the 2" and 6" patterns, I'll add them to this same post.
Saturday, January 18, 2014
Friday, January 17, 2014
Circle Dance Yarn Amounts
I've got yarn amounts for you today, as well as some more square patterns. I hope you are enjoying this project so far!
A bit of housekeeping--I fixed a mistake in Rnd 8 of the 10" square, so if you saved that early in the week you'll want to go grab that again. I also added a round of sc to the 10" square. I added photos to the 4" and 10" squares and moved those to their own post so they're easier to find.
Yarns amounts used for my version http://www.ravelry.com/projects/gourmetcrochet/circle-dance-afghan-crochet-along:
Bernat Super Value
550 yds. Pumpkin
300 yds. Mushroom
175 yds. Aqua
100 yds. Damson
50 yds. Cherry Red
25 yds. Bronze
15 yds. Moss Heather
100 yds. Lush
175 yds. Mulberry
175 yds. Light Damson
250 yds. Denim Heather
175 yds. Lavender
150 yds. Topaz
100 yds. Burgundy
Total yardage is about 2340 yards--about 1240 yards for circles and about 1100 yards for backgrounds.
Circle Dance 2", 4", 6", 8", 10" and 12" square patterns

2” square (make 58)
H hook or size needed
to get a 2” square
Rnd 1: Ch 5, join
with sl st in first ch to form ring, ch 3 (counts as dc), 11 dc in ring, join
with sl st in top of ch 3. Fasten off. (12)
Rnd 2: Join
background color with sc in any st, (sc, ch 2, 2 sc) in same st, sc in next 2
sts, * (2 sc, ch 2, 2 sc) in next st, sc in next 2 sts; repeat from * around,
join. Fasten off.

I hook (5.5 mm) or size needed to obtain 4” square
Rnd 1: Ch 5, join with sl st in first ch to form ring, ch 3, 13 dc in ring, join. Fasten off. (14)
Rnd 2: Join with sl st in any st, ch 3, dc in same st, 2 dc in each st around, join. Fasten off. (28)
Rnd 3: Join background color with sl st in any st, ch 3, (dc, ch 2, 2 dc) in same st, * hdc in next st, sc in next 4 sts, hdc in next st **, (2 dc, ch 2, 2 dc) in next st; repeat from * around ending last repeat at **, join. Fasten off.
Note: If needed, an extra round of sc may be added to hit the 4". Sc in each st around with (2 sc, ch 2, 2 sc) in each corner.

6” square (make 18)
I hook or size needed
to obtain size, taking last rnd into consideration
Rnd 1: Ch 5, join
with sl st in first ch to form ring, ch 3, 15 dc in ring, join. Fasten off. (16)
Rnd 2: Join with
sl st in any st, ch 3, dc in same st, 2 dc in each st around, join. Fasten off.
(32)
Rnd 3: Join with
sl st in any st, ch 3, dc in same st, dc in next st, (2 dc in next st, dc in
next st) around, join. Fasten off. (48)
Rnd 4: Join
background color with sl st in any st, ch 4 (counts as tr), (tr, ch 2, 2 tr) in
same st, * dc in next 3 sts, hdc in next 2 sts, sc in next st, hdc in next 2
sts, dc in next 3 sts, (2 tr, ch 2, 2 tr) in next st; repeat from * around
ending last repeat at **, join with sl st in top of ch 4.
Rnd 5: Ch 1, sc
in same st, sc in each st around with (2 sc, ch 2, 2 sc) in each corner. Fasten
off.
Note: If needed, an extra round of sc may be added to hit the 4". Sc in each st around with (2 sc, ch 2, 2 sc) in each corner.

I hook or size needed to obtain size, taking last rnd into consideration
Rnd 1: Ch 5, join with sl st in first ch to form ring, ch 3, 13 dc in ring, join. (14)
Rnd 2: Ch 3, dc in same st, 2 dc in each st around, join. Fasten off. (28)
Rnd 3: Ch 3, dc in same st, dc in next st, (2 dc in next st, dc in next st) around, join. Fasten off. (42)
Rnd 4: Ch 3, dc in next st, 2 dc in next st, (dc in next 2 sts, 2 dc in next st) around, join. Fasten off. (56)
Rnd 5: Join background color with sl st in any st, ch 4, (tr, ch 2, 2 tr) in same st, * dc in next 3 sts, hdc in next 2 sts, sc in next 3 sts, hdc in next 2 sts, dc in next 3 sts **, (2 tr, ch 2, 2 tr) in next st; repeat from * around ending last repeat at **, join.
Rnd 6: Ch 3, dc in each st around with (2 dc, ch 2, 2 dc) in each corner, join. Fasten off.
Note: If needed, an extra round of sc may be added to obtain the correct size. Sc in each st around with (2 sc, ch 2, 2 sc) in each corner.

I hook (5.5 mm) or size needed to get size, taking last round into consideration
Rnd 1: Ch 5, join with sl st in first ch to form ring, ch 3, 13 dc in ring, join. Fasten off. (14)
Rnd 2: Join with sl st in any st, ch 3, dc in same st, 2 dc in each st around, join. Fasten off. (28)
Rnd 3: Join with sl st in any st, ch 3, dc in same st, dc in next st, (2 dc in next st, dc in next st) around, join. Fasten off. (42)
Rnd 4: Join with sl st in any st, ch 3, dc in next st, 2 dc in next st, (dc in next 2 sts, 2 dc in next st) around, join. Fasten off. (56)
Rnd 5: Join with sl st in any st, ch 3, 2 dc in next st, dc in next 2 sts, (dc in next st, 2 dc in next st, dc in next 2 sts) around, join. Fasten off. (70)
Rnd 6: Join with sl st in any st, ch 3, dc in same st, dc in next 4 sts, (2 dc in next st, dc in next 4 sts) around, join. Fasten off. (84)
Rnd 7: Join background color with sl st in any st, ch 4, (tr, ch 2, 2 tr) in same st, * tr in next 2 sts, dc in next 3 sts, hdc in next 3 sts, sc in next 4 sts, hdc in next 3 sts, dc in next 3 sts, tr in next 2 sts **, (2 tr, ch 2, 2 tr) in next st; repeat from * around ending last repeat at **, join.
Rnd 8: Ch 3, dc in next st, *(2 dc, ch 2, 2 dc) in corner, dc in next 2 sts, hdc in next 3 sts, sc in next 14 sts, hdc in next 3 sts **, dc in next 2 sts; repeat from * around ending last repeat at **, join.
Rnd 9: Ch 1, sc in same st, sc in each st around with (2 sc, ch 2, 2 sc) in each corner, join. Fasten off.
Note: If needed, an extra round of sc may be added to obtain the correct size. Sc in each st around with (2 sc, ch 2, 2 sc) in each corner.

I hook or size needed to obtain size, taking last rnd into consideration
Rnd 1: Ch 5, join with sl st in first ch to form ring, ch 3, 13 dc in ring, join. (14)
Rnd 2: Ch 3, dc in same st, 2 dc in each st around, join. Fasten off. (28)
Rnd 3: Ch 3, dc in same st, dc in next st, (2 dc in next st, dc in next st) around, join. Fasten off. (42)
Rnd 4: Ch 3, dc in next st, 2 dc in next st, (dc in next 2 sts, 2 dc in next st) around, join. Fasten off. (56)
Rnd 5: Ch 3, 2 dc in next st, dc in next 2 sts, (dc in next st, 2 dc in next st, dc in next 2 sts) around, join. (70)
Rnd 6: Ch 3, dc in same st, dc in next 4 sts, (2 dc in next st, dc in next 4 sts) around, join. Fasten off. (84)
Rnd 7: Ch 3, dc in next 2 sts, 2 dc in next st, dc in next 2 sts, (dc in next 3 sts, 2 dc in next st, dc in next 2 sts) around, join. (98)
Rnd 8: Ch 3, dc in same st, dc in next 6 sts, (2 dc in next st, dc in next 6 sts) around, join. Fasten off. (112)
Rnd 9: Join background color with sl st in any st, ch 4, (tr, ch 2, 2 tr) in same st, * tr in next 3 sts, dc in next 3 sts, hdc in next 2 sts, sc in next 11 sts, hdc in next 2 sts, dc in next 3 sts, tr in next 3 sts **, (2 tr, ch 2, 2 tr) in next st; repeat from * around ending last repeat at **, join.
Rnd 10: Ch 3, dc in next st, (2 dc, ch 2, 2 dc) in corner, * dc in next 5 sts, hdc in next 7 sts, sc in next 7 sts, hdc in next 7 sts **, dc in next 5 sts (2 dc, ch 2, 2 dc) in next corner; repeat from * around ending last repeat at **, dc in last 3 sts, join. Fasten off.
Note: If needed, an extra round of sc may be added to obtain the correct size. Sc in each st around with (2 sc, ch 2, 2 sc) in each corner.
Monday, January 13, 2014
Circle Dance Colors and Arrangement Chosen
I’ve finally picked my colors and my
color arrangement. As previously discussed, anything goes as far as color with
this afghan, but if you want to do your afghan like mine in any way, you can
follow these instructions.
Here are my colors:

These are Bernat Super Saver 100% acrylic worsted-weight yarn, 53630 Pumpkin (A), 53009 Mushroom (B), 53201 Aqua (C), 07797 Damson (D), 53436 Cherry Red (E), 53609 Bronze (F), 53241 Moss Heather (G), 53246 Lush (H), 53333 Mulberry (I), 07773 Light Damson (J), 53114 Denim Heather (K), 53307 Lavender (L), 53514 Topaz (M), and 07636 Burgundy (N).
I’m going for this arrangement:

Here is how I plan to achieve this look.
2” square (make 58):
Rnd 1: A
Rnd 2: I
4” square (make 21):
Rnd 1: B
Rnd 2: A
Rnd 3: H
6” square (make 18):
Rnd 1: C
Rnd 2: B
Rnd 3: A
Rnd 4: J
Rnd 5: K
8” square (make 8):
Rnd 1: D
Rnd 2: C
Rnd 3: B
Rnd 4: A
Rnd 5: L
Rnd 6: L
Rnd 7: K
Rnd 7: K
10” square (make 6):
Rnd 1: F
Rnd 2: E
Rnd 3: D
Rnd 4: C
Rnd 5: B
Rnd 6: A
Rnd 7: M
Rnd 8: M
Rnd 9: K
12” square (make 3):
Rnd 1: H
Rnd 2: G
Rnd 3: F
Rnd 4: E
Rnd 5: D
Rnd 6: C
Rnd 7: B
Rnd 8: A
Rnd 9: N
Rnd 10: N
For every square that ends
in a round of sc, I’ll make that last round with K so those squares are consistently “framed”. If you want to do
this, and if you have to work extra rounds of sc on any of your blocks to get
the size, you might want to work that sc round in your chosen framing color.
If you have questions, I encourage you to post them in the comments, because chances are someone else has the same question. If you don't want to post in the comments, you can find me on Facebook.
I have had a few questions asked multiple times today regarding deadlines, registration and yarn choices. There are no deadlines, registration is not necessary, and you are free to choose any colors and yarns you like. I want this to be as fun and stress-free as possible. The only thing I can't help with is weaving in all the inevitable ends! But this is well worth the trouble, I believe.
Circle Dance Afghan Crochet Along
Welcome to the kickoff of our new crochet-along! I can’t
wait to see what everyone does with this afghan design.
Let’s get right to it. This is not a mystery crochet-along,
so I’m going to tell you today what the afghan is, how it goes together, and
some ideas on planning colors.
The Circle Dance afghan design is a 46” x 60” (plus borders)
rectangle composed of six sizes of circle-within-a-square blocks—2”, 4”, 6”,
8”, 10” and 12”. All the squares will consist of circles (rounds) within a
background area, and they’ll be joined in a random-patterned layout. Several of
the sizes end with a round of single crochet so this round can be done in an
accent color if you wish, to add a frame around the blocks.
As far as skill level, the blocks will be pretty easy. And
as long as you measure and work carefully, sewing the blocks together should
not be too difficult. No doubt the assembly part will be the biggest challenge,
though. I’ll be posting assembly instructions after all the block patterns are
posted and we are well underway. And later on, we’ll add some border rounds,
which will be easy. You’ll need to know how to make the basic stitches—sc, hdc,
dc, and tr—and it will be important to get consistent block sizes. For the more
experienced crocheter I’m hoping this project will be big time fun.
The basic arrangement of the afghan is this:

If you want to play with the arrangement, feel free to grab
some graph paper and experiment with putting yours together a different way.
Now to consider color arrangement. At first, I thought I wanted
my afghan to have most of the circles floating on a single background color, with
my dots made with many colors. My afghan would have looked something like this:

Now this idea is beautiful and very modern looking, but the
design really began to pop as I played with background and dot colors. Here are a few more
color arrangement options to consider, keeping in mind that these are just
sample colors:


The mind boggles, does it not? There are many more ideas
you’ll think of, I’m sure. For one thing, I’ve only considered solid colors for
my afghan, but gradient yarn would be gorgeous and I’ll bet some of you will want
to use it. Those long color changes will really be beautiful.
Now that we’ve looked at a number of options for color
selections, let’s talk about options for texture. In addition to the block
patterns I’m providing, if you are so inclined, you can choose from the vast
array of 6”-12” block patterns available online to replace some or all of your
6”-12” blocks. The selection on Ravelry alone is huge, It’s completely up to
you. However, the 2” and 4” blocks have to be made pretty much as I’ve designed
them—not a lot of room for options in those small sizes.
Ready to get started planning?
Here is a downloadable file of the basic block layout showing
each round of the dots.
I know that some of you, like me, are itching to dive in to
the crocheting, so I'll go ahead and post the 4” and 10” block patterns
today. My yarn is supposed to be delivered today so I’ll be starting right
along with you. Once I pick final yarn colors and decide which color
arrangement I’ll use, I’ll post about it. You may also want to
reference the post I made yesterday showing how to make invisible beginnings
and joinings to the rounds. It’s entirely optional of course, but it does look
nice.
And off we go! I sincerely hope you enjoy this process. I’ve
made a Ravelry page here for the project and I look forward to seeing your
photos there! I’ve tried to think of everything, but if I’ve forgotten anything
critical in the beginning instructions here, please let me know in the
comments. I’ll be back later in the week with some more block patterns.
Sunday, January 12, 2014
Invisible Begins and Ends
When working rounds of double crochet, it's possible to create invisible beginnings and joinings. If you want to be fancy with this afghan we are about to make, you can do this. Here's how.
Can you tell the difference between the next two photos? The top one has invisible beginnings and joinings. The joinings show on the bottom one.
To begin a round with a standing double crochet instead of chain 3, make loop on hook, yarn over holding loop with your thumb if needed, insert hook in stitch and pull up a loop. (Yarn over, pull through 2 loops on hook) 2 times to finish double crochet as usual.
To create an invisible join, after working last double crochet, do not join. Cut yarn leaving at least 6 inches; pull yarn end completely through removing loop from hook.
Insert crochet hook from front to back under top two loops of second stitch of round; pull yarn through.
Insert crochet hook from back to front between the top two loops of last stitch worked in round; pull yarn through.
Adjust tension on the yarn to create a join that looks the same as the remaining stitches. Your invisibly joined round is now complete! Bring yarn end to back of work and weave in securely.
Friday, January 10, 2014
Afghan Crochet Along Starting Next Week
Several people have asked me to do another afghan crochet-along. So we are going to do one! I've ordered yarn (Bernat Super Value worsted-weight acrylic) and have worked out all the block designs and the layout. UPS says my yarn will be here Monday, so next week sometime I'll be posting the first block pattern and information. It's not going to be a mystery crochet-along--I'm going to tell you what we're doing before we get started so you can plan your own one-of-a-kind masterpiece.
I can tell you now that this afghan offers lots of choices, and if you don't prefer the way I'm doing mine, there are many things you can change to suit yourself and still stick with the general afghan design. It's an opportunity to enjoy being creative no matter which path you choose.
So if you want to start gathering yarn, I have some preliminary information for you. I'm going to start with one big skein each of a lot of happy colors. I'll use maybe 15-17 colors. I'll let you know exactly which ones when mine arrives. I'll also possibly use one background color as yet to be decided, for which I figure I'll need 2-3 skeins. This will be a great scrap project if you want to destash to start the year off! Even though I'm planning to use a lot of color, I think it would also be nice in a more limited color palette. The choice is really yours. I'll show you an idea I have for making it in 7 colors. And the background being one color is optional. Joann still has the Bernat Super Value for a really great price online in case you're interested. I like it because it's a very smooth and soft yarn with an almost cottony feel to it.

That's about it for now! I hope you'll join me in making an interesting and unusual afghan.
I can tell you now that this afghan offers lots of choices, and if you don't prefer the way I'm doing mine, there are many things you can change to suit yourself and still stick with the general afghan design. It's an opportunity to enjoy being creative no matter which path you choose.
So if you want to start gathering yarn, I have some preliminary information for you. I'm going to start with one big skein each of a lot of happy colors. I'll use maybe 15-17 colors. I'll let you know exactly which ones when mine arrives. I'll also possibly use one background color as yet to be decided, for which I figure I'll need 2-3 skeins. This will be a great scrap project if you want to destash to start the year off! Even though I'm planning to use a lot of color, I think it would also be nice in a more limited color palette. The choice is really yours. I'll show you an idea I have for making it in 7 colors. And the background being one color is optional. Joann still has the Bernat Super Value for a really great price online in case you're interested. I like it because it's a very smooth and soft yarn with an almost cottony feel to it.
That's about it for now! I hope you'll join me in making an interesting and unusual afghan.
Wednesday, January 1, 2014
Springtime Market Bag Pattern


Happy New Year! I'm excited about 2014 and I hope you are too. I thought this big bag would be the perfect way to start off the new year. It's bright and springy, and big enough to hold enough yarn to make a whole afghan. Or groceries, if you are so inclined. I always think of yarn first.
Things are pretty quiet around here this New Year's Day. My husband, my daughter Whitney, my mother and I are all busy working on plans for the year and starting new projects.
Someone wonderful sent me an e-card this morning, and this is what it said:
Wishing you health so you may enjoy each day in comfort.
Wishing you the love of friends and family and peace within your heart.
Wishing you wisdom to choose priorities for those things that really matter in life.
Wishing you generosity so you may share all good things that come to you.
Wishing you the blessings of happiness and joy in the New Year.
Wishing you the best of everything that you so well deserve.
It's the best New Year's greeting I've ever received--thank you, Victoria! I passed the sentiment along to all my Facebook friends and would wish the same for everyone reading this. Thank you, thank you for your support of my crochet--it seems all my dreams are crochet dreams :)
Enjoy the bag pattern!
Springtime Market Bag
Size
About 21” across and 17” tall plus handles
Materials
Worsted-weight yarn:
About
250 yards each soft white and spring green
Small
amounts purple and lavender
G hook
Four 1” buttons
Sewing needle and sewing thread
Gauge
Gauge is not critical with this bag; fabric should be fairly
firm.
My gauge is 14 dc = 4”; 8 rows dc = 4”
Instructions
Rnd 1: With
green, ch 5, join with sl st in first ch to form ring, ch 3 (counts as dc), 13
dc in ring, join with sl st with white in top of ch 3. Do not turn any rnds.
(14)
Rnd 2: With
white, ch 3, dc in same st, 2 dc in each st around, join with sl st with green.
(28)
Rnd 3: With
green, ch 3, dc in same st, dc in next st, (2 dc in next st, dc in next st)
around, join with sl st with white. (42)
Rnd 4: With
white, ch 3, dc in next st, 2 dc in next st, (dc in next 2 sts, 2 dc in next
st) around, join with sl st with green. (56)
Rnd 5: With
green, ch 3, 2 dc in next st, dc in next 2 sts, (dc in next st, 2 dc in next
st, dc in next 2 sts) around, join with sl st with white. (70)
Rnd 6: With
white, ch 3, dc in next 3 sts, 2 dc in next st, (dc in next 4 sts, 2 dc in next
st) around, join with sl st with green. (84)
Rnd 7: With
green, ch 3, dc in next 2 sts, 2 dc in next st, dc in next 2 sts, (dc in next 3
sts, 2 dc in next st, dc in next 2 sts) around, join with sl st with white.
(98)
Rnd 8: With
white, ch 3, dc in same st, dc in next 6 sts, (2 dc in next st, dc in next 6
sts) around, join with sl st with green. (112)
Rnd 9: With
green, ch 3, dc in next 3 sts, 2 dc in next st, dc in next 3 sts, (dc in next 4
sts, 2 dc in next st, dc in next 3 sts) around, join with sl st with white.
(126)
Rnd 10: With
white, ch 3, dc in next 7 sts, 2 dc in next st, (dc in next 8 sts, 2 dc in next
st) around, join with sl st with green. (140)
Rnd 11: With green,
ch 3, dc in next 4 sts, 2 dc in next st, dc in next 4 sts, (dc in next 5 sts, 2
dc in next st, dc in next 4 sts) around, join with sl st with white. (154)
Rnd 12: With
white, ch 3, dc in same st, dc in each st to about halfway around bag, 2 dc in
next st, dc in remaining sts, join with sl st with green. (156)
Rnds 13-35:
Changing colors on each row as established, ch 3, dc in each st around, join.
On last rnd, continue with green.
Rnd 36: With
green, ch 1, sc in same st, skip next 2 sts, 5 dc in next st—shell made; skip next 2 sts, (sc in next
st, skip next 2 sts, shell in next st, skip next 2 sts) around, join with sl st
in first sc. Fasten off. (26 shells)
Rnd 37: Join
white with sc in center dc of any shell, shell in next sc, (sc in center dc of
next shell, shell in next sc) around, join. Fasten off.
Rnd 38: Repeat
rnd 37 with green.
Handle (make 2 with
green)
Row 1: Ch 101, sc
in second ch from hook, sc in each ch across, turn. (100)
Rows 2-6: Ch 1,
sc in each st across, turn.
Fasten off.
To sew handles to bag, locate and mark center 6 shells at
front and back of bag (using seam as center back of bag). Center handle end
over each marker and sew one handle to front and one handle to back of bag.
Flowers (make 4)
Bottom layer
Rnd 1: With
lavender, ch 5 join with sl st in first h to form ring, ch 1, 7 sc in ring,
join. (7)
Rnd 2: Ch 3, 2 dc
in same st, 3 dc in each st around, join. (21)
Rnd 3: Ch 1, sc
in same st, (3 dc in next st) 2 times, (sc in next st, 3 dc in each of next 2
sts) around, join. Fasten off. (7 petals)
Top layer
Rnd 1: With
purple, ch 5, join with sl st in first ch to form ring, ch 3 (counts as dc), 14
dc in ring, join. (15)
Rnd 2: Ch 1, sc
in same st, (3 dc in next st) 2 times, (sc in next st, 3 dc in each of next 2
sts) around, join. Fasten off. (5 petals)
Finishing
Stack bottom and top layer of flowers with button on top,
forming 4 flowers. Sewing through all layers, sew button in place. Sew flower
over each place where handle is attached to bag.
Linking to:
http://www.mooglyblog.com
Subscribe to:
Posts (Atom)